Taking measurements within the motor compartment presents quite a challenge. It is difficult to measure between the studs and the sides of the motor, the vertical aspect, etc. The following method was decided upon, with full understanding that although the measurements will not be exact, that they should be sufficiently close to achieve the required result.
Part 1:
Part 1:
Sooooo, having said that, the Warp 11 was initially positioned as close to center (between the two motor mount stud bolts) as could be measured. The focus was more upon having an identical distance from the center of each stud to the side of the motor, than having the exact measurement itself. Both dimensions were adjusted until they were eventually different by less than 1 mm. The base of the motor was previously shimmed with wooden wedges to elevate it off the frame and position it vertically. The actual vertical height above the frame (and relative to the engine mounts) will be reported later once there is greater confidence in the measurement.
The way the measurements were determined was as
follows. A 30”x24”x
0.125” cardboard sheet was first measured to mark the mid line, allowance was made for a minimum space of 1" at the top of the cardboard (for a
future cross brace). The outline of the 11.45" outer diameter of the Warp 11 motor was centered, outlined, and cut out. The drawing was then cut in half, so that the bottom edge of the cardboard would essentially be at the height of contour (ie., the "equator" of the Warp). The final dimension of the top cardboard piece (which only has half of the Warp outline) was 10.625" tall x 24" wide. This allowed the cardboard template to drop snugly onto the top of the Warp 11 motor. The centers of two smaller square pieces of cardboard were then marked so that they could be aligned very closely with the centers of the M10 studs that protruded from the rubber engine mounts. The edges of the cardboard squares were exactly flush with the metal landing areas of the engine mounts. When all three pieces of cardboard were stable and in direct contact, 1.875" wide Scotch tape was carefully applied to bind all of the pieces together.
Picture DSC05406
showing the cardboard template positioned on the Warp 11 and the cardboard "feet" resting on
the motor mounts. All three pieces were then taped carefully together.
The entire cardboard
jig was then pulled directly out of the motor compartment and laid on a fresh
20" x 30" cardboard sheet. The relationship of
the bottom edges of the small cardboard were then transferred to the new
cardboard and a full scale drawing made to show the final relationships of the
Warp 11 and the mounting pads.
Picture DSC05404 showing the cardboard "template" positioned on a fresh cardboard for transfer of the critical dimensions.
This process did not require that the car be level,
nor did it matter if the 12"x24" cardboard piece was level to either the floor or to the
plane of the car. As it turned out,
after drawing a horizontal line that connected the midpoint of the base of each mounting stud, and extending the lines that represented the landing area of the
mounting pads, the extended landing area lines joined at almost exactly the mid line, and at 150
degrees relative to each other !! Thus, the motor mounts are each -15 degrees relative to horizontal !!!
Measured Approximate Dimensions of 1992 BMW 325i motor mounts:
Distance from center to center of studs (of engine mounts): 23.8125 inches
Angle of landing pads of engine mount relative to the horizontal plane: -15 degrees.
(Both motor mounts angle downward toward the mid line of the car.)
Height of the M10 studs embedded in the hard rubber mounts: 1.0625 inches
Approximate diameter of the metal landing area that is cast into the rubber engine mount: 1.75 inches.
Part 2:
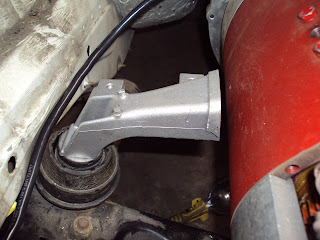
It appeared that the BMW driver side motor mount (it arches over the steering column) might provide some useful dimensional information. Two new units were purchased directly from Patrick BMW (in stock and $38 each) and then with a band saw, a series of sections were removed and the resdiual mounting piece then bolted to the motor mounting studs to better visualize the spatial orientation.
Picture DSC05348 showing bottom (left) and top (right) views of the BMW driver side motor mounts.
Picture DSC05349 showing the leading side view (left) and trailing rear view (right) of the BMW driver side motor mounts.
Picture DSC05386 showing the sectioned views of the BMW driver side motor mount during trial fittings.
Picture DSC05393 showing the final sectioned BMW driver side (left) motor mount bolted to the driver side mounting. The steering column is to the upper left.
Picture DSC05388 showing the second sectioned BMW driver side motor mount bolted to the passenger side (right) motor mount.
Picture DSC05398 showing the top view of both motor mounts bolted to place on the engine mounts. Note the lack of symmetry. The actual distance between the mounting brackets and the sides of the Warp 11 are essentially the same. The apparent difference is due to the camera angle.
The next task will be to weld mounting plates to the face of each sectioned motor mount. Finally, a clam-shell design circumferential clamp will be made that can be bolted to both the motor and to the welded plates on the sectioned engine mounts. Generation 2 motor mounts will be made from scratch as symmetrical castings with mounting points pre-drilled and ready for attachment to a clam shell designed circumferential clamp.


William, I'm very eager to see how this mount turns out. So far it looks quite promising. Thanks for all the great detail.
ReplyDelete