All of the initial testing of the Getrag transmission has been conduced without the gear shifter being installed and in the next step of testing it is hoped to fully operate the transmission and shift through all of the gears with the Warp 11 energized. To achieve this requires the following improvements: attach the clutch slave to the transmission; replace the brake/clutch fluids with fresh fluid; bleed air from the clutch fluid lines; install the gear shifter and linkages; and fill the transmission with fresh fluid. At that point, with the car remaining on four jacks, it should be possible to operate the transmission and run it through all of the gears at different motor speeds.
Previously a backup 5 speed Getrag transmission was purchased on Ebay that was listed as being from a 2002 BMW E46 325i. Online research suggested that it should be identical to the transmission from a 1992 BMW. It was decided to maintain the original 1992 transmission, but replace the shifting mechanism and shifter knob with the 2002 parts as they were in better cosmetic condition. Sadly, after attempting the substitution, it was discovered that the 2002 arms do not fit! Subsequent careful comparison (which should have been dome prior to initial attempted assembly!) showed the obvious reason why, they are of slightly different lengths, ugh!!

Picture DSC01510 showing the 2002 E46 shifting arm (top) and the 1992 E36 shifting arm (bottom). Although the transmissions appear to be the same, the shifters are definitely not. The difference was discovered when it was attempted to install the 2002 assembly into the 1992 car. Once installed the 2002 shift knob shaft was angled forward and the shift lever bearing was pressing against the rear of the center console opening such that it would not rotate freely. By comparison, when the 1992 shifting arm was installed, the shifting bearing was centered in the console opening, the shift knob shaft was perpendicular to the floor, and it could be moved freely in any direction..

Picture DSC01514 with the 2002 (top) and the 1992 (bottom) straight selector rods also of different lengths.
Installation of the shifting mechanism proved to be a lengthy project, but after multiple attempts and a lot of practice, it was learned how to rapidly install or remove all of the components.

Picture DSC01345 showing the center console still in place, with the rubber shifter covering removed (left center). The black drive shaft is visible through the circular opening at the right center. The shifter mechanism passes directly under the circular opening and the shift knob shaft passes up through the round hole, and then the rubber shifter covering, and finally the gear leather cover (boot).
It was not possible to access the top of the transmission from within the cabin. The motor mount bolts were removed and the front of the Warp 11 raised with a floor jack. The drive shaft center support bearing assembly was disconnected from the car frame to allow the drive shaft to lower significantly away from the console area.

Picture DSC01512 showing the open area created after the drive shaft was lowered away from the console dome.
The challenge is to connect the transmission to both the shifting arm (part 1 in diagram 1) and the straight selector arm (part 9 in diagram 1).
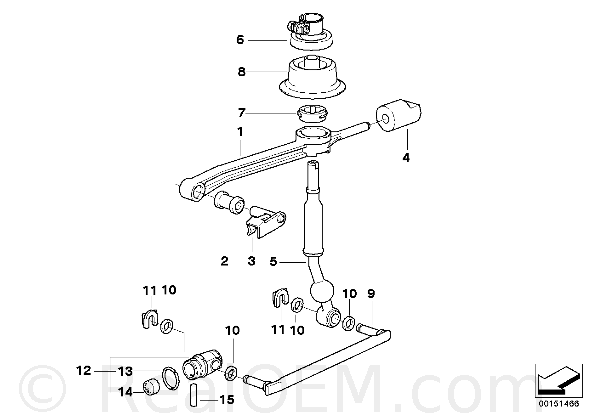
Diagram 1 is a parts diagram from the RealOem.com website (a phenomenal resource for parts and diagrams) showing an exploded view of all of the Gearbox Shifting Parts. See: http://www.realoem.com/bmw/showparts.do?model=CB33&mospid=47498&btnr=25_0013&hg=25&fg=05

Picture DSC01501 demonstrating the shifting arm (center silver) and the straight selector arm (bronze color to the bottom left) both attached to the 2002 Getrag transmission.

Picture DSC01504 showing (view from under the car) the bottom of the console dome and the original rusted shifter arm bearing being held by a welded bracket on the car frame. The shifter bearing was removed by inserting a screwdriver between the steel cylinder and the bracket and separating the two parts. This bearing is a metal tube with a rubber molded insert that slides over the tail section of the shifting arm. Its purpose is to hold the shifting arm horizontally and allow for slight rotation and slide as the shifter is moved.

Picture DSC01505 after removal of the shifter bearing. There are two slots on opposite sides of the shifter bearing that allow the metal tabs on the bracket to snap into place.

Picture DSC01507 showing the 1992 shifter bearing on the left and the 2002 bearing on the right. Note that the metal ring is not contiguous and the molded black rubber is visible in the center. This may allow for some compression of the metal cylinder during installation. The newer shifter bearing was used to replace the rusted one on the left.

Picture DSC01509 end view of the 1992 shifter bearing on the left and the 2002 bearing on the right. The center opening allows for support of the rear end of the shifting arm as well as permitting both rotational and lateral movements of the arm during the shifting process

Picture DSC01513 after the shifting arm was inserted into the bracket on the top of the Getrag and the retaining bolt (part 3 in Diagram 1 above) was inserted and locked into place. It was necessary to elevate the tail of the transmission and the drive shaft, as required, to fit the shifting arm and straight selector rod into place.


Picture DSC01502 showing the shifting arm installed and locked into place with the 10mm x 40mm retaining bolt (top right) snapped onto the transmission frame.
The most challenging task for the installation turned out to be the pressing of the shifting bearing back into the bracket at the top of the console dome.
No comments:
Post a Comment