LEM CAB300-C Flux Gate Current Sensor
ZEVA Fuel Gauge Driver
JLD-404 Intelligent Amp Hour Meter
Xantrex LinkPro Battery Monitor
Electric Vehicle Interface Controller (EVIC)
The LEM CAB300-C and the ZEVA Fuel Gauge Drive do not require direct connection to the drive battery pack while instead they require that one of the power cables pass thru a coil that is integral to the sensor.

Picture of LEM CAN bus current sensor ( http://www.lem.com/hq/en/content/view/543/126/ ) One of the cables from the drive battery pack passes through the center of the device and there is no direct connection made between the pack and the vehicle's housekeeping +12 volt DC battery. This device uses a standard CAN bus interface and an Arduino type device with a CAN bus shield interface is required to collect the data. This device can measure amperage or amp hours (+/- 400 amps), but without a measurement of the pack voltage, a power measurement is not available. Priced at about $139
This same type of device is incorporated into a Zeva Fuel gauge which is prewired and does not require a CAN interface to operate.
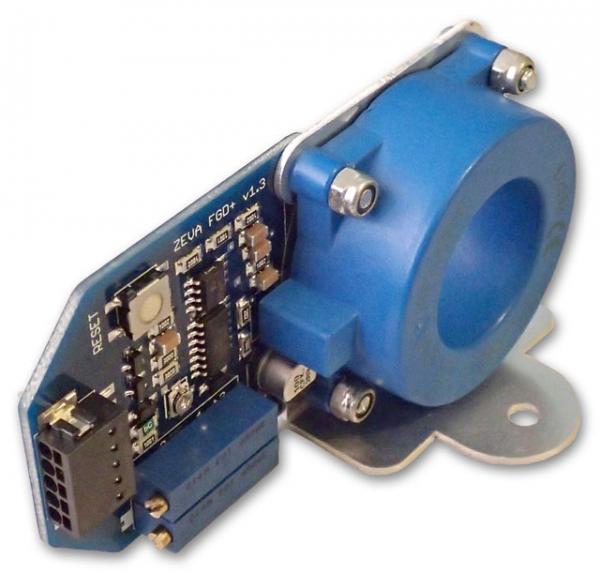
Picture of a ZEVA Fuel Gauge ( http://www.zeva.com.au/index.php?product=103 ). This device is available from various domestic distributors. These devices re priced between $150-$200 depending upon the features desired.
The manufacturer indicates that the ZEVA also has the ability to output a signal directly to the fuel gauge to provide an indication of the batteries State of Charge (SOC). It also can provide a signal that can convert the instrumentation tachometer into an output of instantaneous current and thus provide an indication of real time power consumption. One of the problems with this type of sensor, is that at under low current (or no current) situations, the measurement is not as reliable and drift can become a problem. The device is sensitive enough that its output can vary relative to the sensor's orientation to Earth magnetic North. 12 volt power must be maintained to the device or the measurements are lost.
A very sophisticated and new to the market device is the Electric Vehicle Interface Controller (EVIC) that is available from both Andromeda Interfaces, Inc. ( http://ai-displays.com/product/e-v-i-c-basic-enclosure/ ) and their distributors. With a price tag of about $700, this device operates over a CAN bus and it can simultaneously display multiple parameters, including: Motor Temperature; Controller Temperature; Motor RPM; Motor Voltage (VDC); and Motor Charge and Discharge Amperage (Amps).

Picture of an Electric Vehicle Interface Controller (EVIC) supplied by the Andromeda Interfaces company.
Alternatively an intelligent amp hour meter can be used and popular examples include the JLD-404 (Picture DSC04182) and the Xantrex LinkPro (picture below). Each device requires a shunt to be inserted directly into the drive battery circuit. Since these shunts are live they pose a potential shock hazard and they must be located within a protective enclosure.

Picture DSC04182 of a JLD-404 intelligent Amp Hour Meter. These instruments are modestly priced between $70 and $120 depending in part upon the supplier and the shunt selection. The JLD-404 can measure up to 9999 amps, pack voltage up to 500 volts, amp hours, and time. It also has two internal relays (NO and NC) that can be programmed to perform based upon the measurements taken by the device. Typically 75 mv shunts are used with this device, but 50 mv shunts may also be used by modification of the set up parameters during installation. A user manual can be found at http://evwest.com/support/JLD404AH-Eng.pdf .

Picture of a Xantrex Link Pro which is premium priced at about $275. The Xantrex Link Pro can measure currents up to 10,000 amps, pack voltage up to 350 volts, charge and discharge current, and amp hours consumed and remaining within the pack. Owners guide can be found at http://www.xantrex.com/documents/Accessories/LinkPro-Battery-Monitor/LinkPRO_Operation(975-0430-01-01_rev-C).pdf
The 325i build described in this blog will initially focus on the use of the JLD-404 with its accompanying shunt. A shunt should be matched to the expected maximum current flow and it can typically range from less than 200 amps to more than 1000 amps. Initially a 1000 amp 75 mv shunt was purchased since the Soliton 1 can handle up to 1000 amps. The full 75 mv will be measured only when the maximum 1000 amps is passing through the shunt. The initial testing demonstrated that on level ground and at low speeds the Warp 11 was drawing only about 25 amps and one would anticipate that the voltage drop across the shunt would be only (25/1000)x75mv=1.875 mv. This is a very small signal and an alternate 200 amp shunt was substituted because with the same 25 amp draw, the signal would be anticipated to be (25/200)x75mv=9.375 mv.
The connections between the car and the JLD-404 are as follows:
Pin 1 will be connected to +12 house battery;
Pin 2 to house battery ground (car chassis);
Pin 5 to the +144 of the drive battery pack;
Pin 9 (which is the 75 mv input) to the shunt terminal farthest away from the drive battery ground;
Pin 10 to the drive battery - shunt terminal closest to the drive battery ground.
Prior to connecting the JDL-404 to the car, measurement with a Fluke 233 True RMS Multimeter confirmed that there is an open circuit between Pins 1 and 2 and all other Pins on the device. This suggests that the JLD-404 power supply circuit (Pins 1 and 2) is internally isolated from the high voltage section of the device.

Picture DSC042402 showing the installed JLD-404 in operation during operation of the car.
Electrical safety is personally and financially very important. The proof that one can build an EV in the garage, starting with a basic understanding about cars, access to the Internet, and a modest check book, would be seriously eroded if the car occupants were injured or the build itself incinerated due to electrical defects. While attempting to visualize the possible placement of a 200 amp shunt in the fuse and relay box, accidental contact was made between both sides of the battery pack !! (Picture DSC04102)

Picture DSC04102 of the damaged control and safety module. Molten Aluminum sprayed onto the back of the passenger side front seat !!
The energy release was loud and a grey white cloud accompanied the molten Aluminum spray. The batteries do not have the characteristic gasoline smell to remind one that there is a present danger. The addition of a master shut off within the battery pack will be desirable so that tinkering with the pack can be done safely. Good luck did prevail as other than replacing some minor cable component parts, the expensive fuses remained intact. The currently installed 600 amp fuses are probably more appropriate for Lithium Iron Phosphate batteries (for example CALB 180 styled batteries). Smaller amperage fuses of perhaps 400 amps may be more appropriate when testing the Optima Yellow Tops. Had the short circuit not blown the pieces apart and instead welded the shunt to the contact points, the final outcome of the incident might have been quite different.

Picture DSC04106 of the bottom of the shunt after the incident.

Picture DSC04105 of the top of the damaged shunt. The small screws on the top are for connection to the 75 mv signal inputs of the JLD-404. The damaged screw was welded to the body of the shunt and the fused metal had to be ground away prior to its replacement. The screw appeared to be an M5 .8 x 6, but this size was not readily available, so alternatively both screws were replaced with an M5 .8 x 8 along with a #10 stainless steel washer.
The JDL404 requires a shunt that is in series with the pack voltage circuit and it must be isolated from the chassis and protected from accidental contact with tourists. The control and safety module currently located in the back seat provides both of these requirements. It was elected to place the shunt on the ground leg of the pack circuit, and a space very similar to the length of the shunt was available between a relay and its corresponding fuse. Since this space was initially the positive side of the battery circuit, the wiring was switched so that the space available became the ground leg. See pictures DSC04110 and DSC04111.

Picture DSC04110 top view of the installed 200 amp 75 mv shunt in the control and safety module. Previously the foreground circuit was positive voltage (picture DSC04102), but since an ideal space was present in which to place the shunt, the circuits were exchanged

Picture DSC04111 of a side view of the installed 200 amp 75 mv shunt in the control and safety module. The 200 amp shunt mounting holes are 3.375" apart, while the 400 and 1000 amp shunts have mounting holes that are 3.9375" apart. Since the fuses and relays are mounted using a strut channel, it is very simple to relocate the fuse (foreground) to accommodate shunts of different lengths.
Shunts
A shunt allows the measurement of the current flow provided by the pack and when coupled with a pack voltage measurement, it can provide a measurement of total power use (or alternatively when charging the pack, the degree of battery charge).

DSC05774 of a 75 mv 400 amp shunt. (updated 4/3/17)
Picture of a 75 mv 200 amp shunt. Two black elements connect both posts. Initial tests of the Lead acid batteries while driving at modest speeds on level ground suggests that 25 amps was all that was being consumed. For higher performance testing, and especially with Lithium Iron Phosphate cells, a 400 amp or 600 amp shunt will be substituted later.

Picture DSC04218 of a 400 amp shunt showing four conducting black elements.

Picture DSC04215 showing the method used by the manufacturer to calibrate the shunt by equally reducing the cross sectional areas of each black conductive elements with a saw.

Picture of a 75 mv 1000 amp shunt. For this style of shunt each of the ten black elements passes 100 amps. Each black element is actually a 75 mv 100 amp shunt, and in principle one could make a custom shunt if needed. For example, by cutting away one of the black elements, one would make a 75 mv 900 amp shunt.
Fuses for JLD-404 connections
Each of the three electrical leads connecting the shunt to the JLD-404 were fused using panel mount fuse holders ( http://www.mcmaster.com/#7087k15/=yb2si5 ) along with 0.25 amp ceramic fuses ( http://www.mcmaster.com/#71385k21/=ygp4x7 ). The fuse holders were designed for 0.125" thick panels, but were easily modified using a screw driver to remove a plastic spacer so that they then fit nicely with a 0.250" panel.

Picture DSC04123 showing the fuse assembly as initially received (top) and after removal of the plastic spacer (center at right), and final assembly to make the fuse holder compatible with a 0.250' thick panel.

Picture DSC04136 showing on the left the fully insulated Quick-Disconnect Terminal, 0.25" W x 0.032" Thickness Tab ( http://www.mcmaster.com/#7243k11/=yb37oj ) for attachment of the wires to the tabs on the fuse holders. On the right is a Ring Terminal, 5/16" Screw Stud Size ( http://www.mcmaster.com/#7113k733/=yb381i ) for connection of a wire from the fuse holder to the +144 volt input of the Kilovac relay. Very small AMP Spade Terminals (22-18) were required to make the connections on the back of the JLD-404 .

Picture DSC04131 of the end plate of the battery safety box. Both sides of the shunt (ground and 75 mv outputs) as well as the pack voltage reference wire were fused to 0.25 amps. The high voltage reference wire (McMaster part 8054T811) is an 18 gauge wire that is rated 600 volts. After this picture was taken the ground wire was later moved from the center to the far right, and the 0-75 mv wire was moved from the far right to the center.

Picture DSC04220 showing the inside view of the three 0.25 amp fuses that were inserted into the circuits prior to connection to the JLD-404.

Picture DSC04219 of the top view of the control box. The battery pack enters from the left and then passes through a pair of 600 amp fuses. The negative (or ground leg) cable in the foreground then passes through a 200 amp 75 mv shunt which is then connected to the input of the control relay. The yellow connections are on the top of the shunt. The pair of yellow tabs on the left (shielding braid and the cable black wire) are connected to the input of the shunt, while the yellow tab on right side (small red wire) was connected to the output of the shunt. These wires were then routed through a pair of fuses located on the left wall of the box prior to being connected to the JLD-404. At the top center of the picture can be seen a small blue wire that provides pack voltage to the JLD-404. This wire is connected to the relay input post and after passing through a fuse on the left wall, it then is connected to pin 5 of the JLD-404.
Hi William, Some pretty impressive stuff you are doing here. I've only had a quick look at the moment and wondering a few things, why did you use fuses for your low current control/metering, noted use of the ceramic fuse assuming for rupturing capacity/trip characteristics. Is there a reason not to use C/B's, for example R.S Components do these things http://au.rs-online.com/web/p/thermal-magnetic-circuit-breakers/8688796/ although this example are only rated 48V DC other similar C/B's even lever type quicklag. Also I looked up the 600Amp fuse your battery pack uses http://www.ferrazshawmutsales.com/pdfs/A30QS.pdf What did you end up doing for your main fuses, the QS600 will take a full 30 seconds to blow at 1500AMP and approx 1sec at 2200AMP so I'm guessing you would have reduced the size of these as stated in your blog.
ReplyDelete"Great insights on the JLD404 AH Meter installation! For those working on precise measurements, I’ve found that pairing it with a Fluke 289 True RMS Multimeter really helps in verifying the accuracy of the readings. The combination provides a comprehensive view of the battery pack's performance, especially during high-demand operations. Definitely a game-changer for EV enthusiasts!"
ReplyDelete